Following on from the previous post, here is the process involved in creating my second Gromit, "Blazing Saddles" for Gromit Unleashed. He has been kindly sponsored by Double Tree by Hilton, a hotel next to St Mary Redcliffe in Bristol City Centre, and can be found outside the hotel until the trail ends on September 8th.
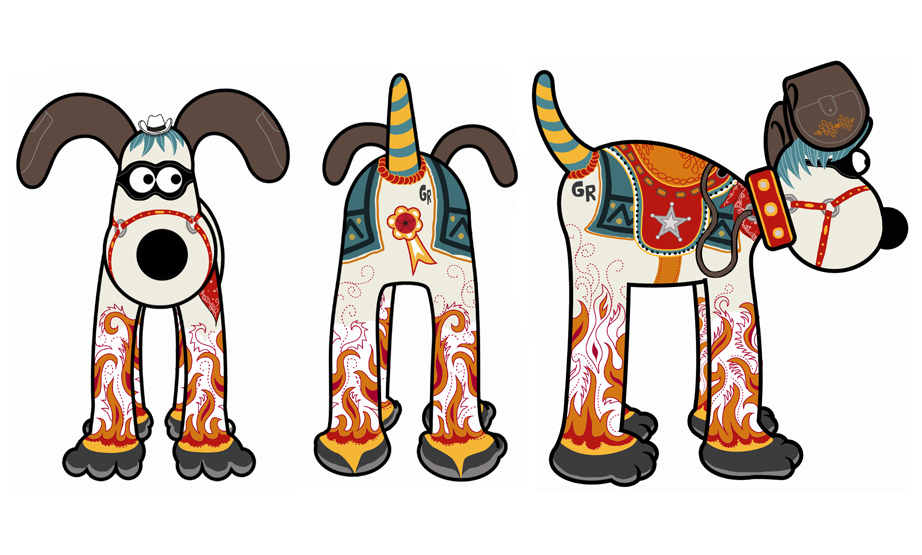
Above are the designs I submitted for the project - front, back and profile views of my proposed dog.
In creating this Wild West themed design I was inspired by the Lone Ranger and the cowboy style of 1950’s Westerns, and combined this with references to decoratively painted horses of fairground Merry-Go-Rounds. He is a stylised take on the fictional masked character, renowned for fighting injustice in the American Old West... Ride ‘em cowboy lad !
In this post I will run through the process of transforming my initial designs into the finished Gromit, as he appeared on the Gromit Unleashed trail.
The first stage of production was uncharted territory for me, having not really done too much modelmaking, and certainly never worked with fibreglass before. I had incorporated a mini cowboy hat into the design - deliberately small as I liked the comic nature of this, but in addition it meant a more manageable task for me as the hat wouldn't interfere with Gromit's ears. I sought advice for how to go about making the hat from an artist/modelmaker I had met whilst working on the Wow!Gorillas project, a very nice chap called Tone Hitchcock - Thanks Tone!

So having taken advice on board, my plan was to make the hat first and then attach it to Gromit's head. I took measurements of Gromit's head and was able to roughly work out the size and shape the hat needed to be. I then made a low-tech model which would form the basis of the hat. For this I bent a metal lampshade hoop to achieve the curve of the brim, and then fitted the curve with some fairly rigid cardboard, bulked what would be the main part of the hat with tinfoil and just taped the whole thing together.
Then came the fun part! I used glass fibre repair paste from Halfords which would generally be used for car body repairs - as you might expect it is a paste with threads of fibre glass in it. The process was a bit like modelling with 'stewed rhubarb' but it dries hard in about 15/20 minutes so is great for building up layers. Once happy with the general shape, I sanded off any protruding bits and then began to work with a finer grade body filler called "Quick Sand". Again, I applied it in layers, sanding in between each application until satisfied with the overall shape.
Throughout this process my main concern was to produce something which would be sturdy enough to handle being out in the public realm. It was for this reason that I made the brim of the hat quite chunky, and just shaped it to an edge to achieve the general effect of an actual hat brim.
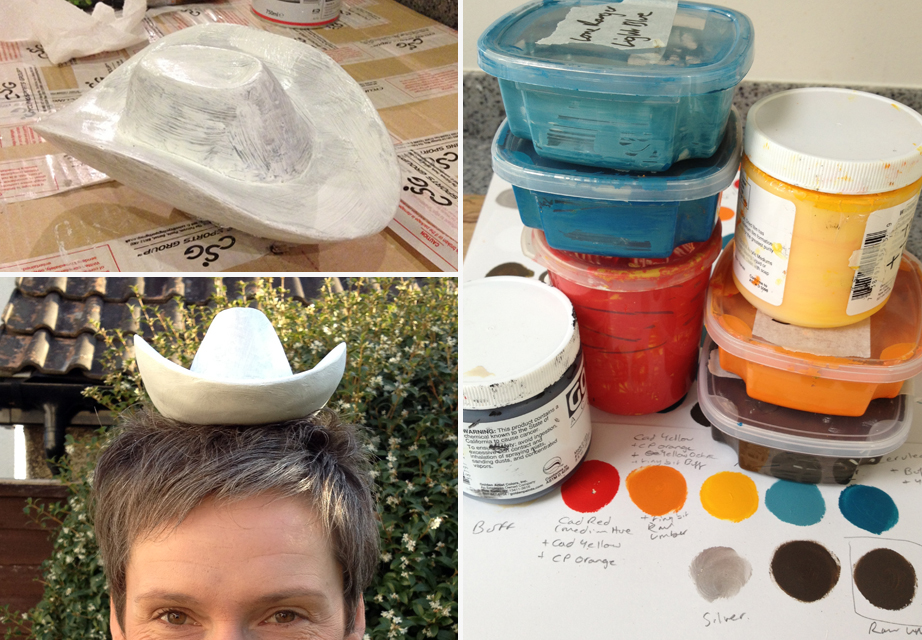
Once the hat was made, I primed it and prepped the colours I would need for painting. I used Golden acrylics and custom mixed my colours to match the design.

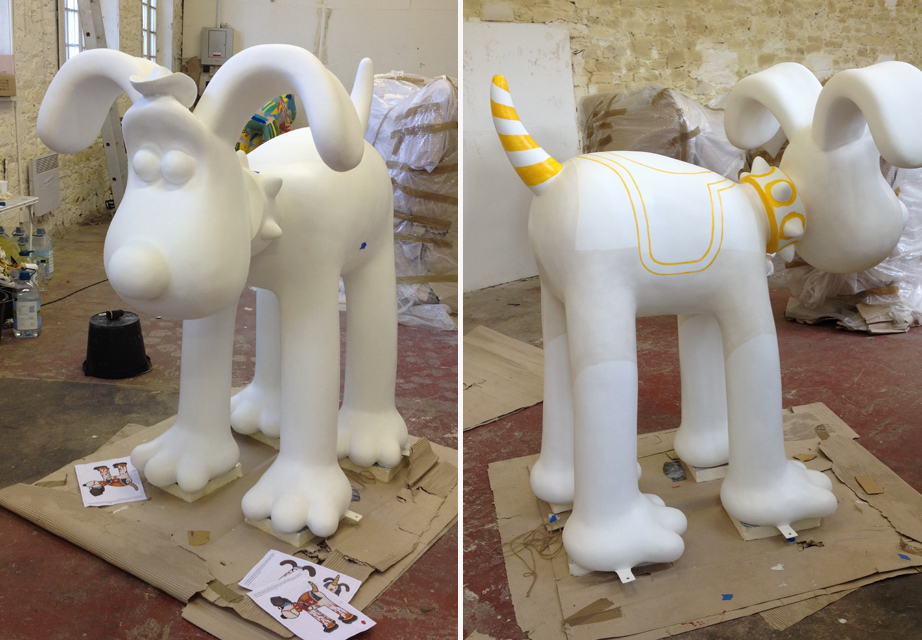
A freshly unwrapped Gromit.
Next stage - Hat fitting! For this I took Gromit outside the provided painting space so as not to be a nuisance to the other Gromit artists - the process was going to be a bit smelly ( because of the glass fibre paste) and dusty...

It wasn't apparent from the supplied templates used at the design stage, that Gromit's brow sloped back rather than providing a good surface on which to sit a hat. The solution I arrived at was to build his head up so that the hat could sit level. I began by scuffing up the very smooth fibre glass sculpture with a rasp to enable good adhesion and then followed the same process as for making the hat, applying glass fibre repair paste and the easy sanding body filler to shape behind his brow. Once happy with the shape, I applied a good dollop of repair paste, to act like glue and positioned the hat in place. There followed a minor bit of filling and sanding where the hat met the head, and then primed the area. Job done!
Now on with the painting... This time I primed the whole dog first with acrylic Gesso, which gave a better surface for the paint to stick to. I marked out the main areas with chalk and masking tape and began painting with the lightest colours first.

I made templates for the more graphic elements and traced round these to use as guides.

The build up of colours and elements in the design. As you can see, the colours appear quite streaky at first, numerous coats of each colour were required.

All the Gromits looked a bit weird until they have their eyes put on!

I left the flame painting on the legs until the end mainly because I figured this would be quite tricky. Although the flames were clear in my designs, they didn't necessarily equate to a design which would wrap around each leg and work from all angles. So I just went for it, working roughly from my designs... but with a more organic approach!

Surrounded by other Gromits at various stages of completion. The painting space provided for the project by Aardman was a great place to work in terms of meeting the other artists and watching their designs progress - really interesting stuff!

Eyes are on...! I have to say I regretted the red line work I had added to the flames at the design stage, made me realise that details which are added on the Mac can often take a lot longer with a paintbrush...

The finished dog!

Wrapped and ready to be lacquered.

...And there he is out on the trail, #40 on the map, outside Double Tree by Hilton ( along from St Mary Redcliffe in Bristol City Centre ). If you're local to Bristol, why not pop along and check him out, or go crazy and try and spot all 80 Gromit sculptures that can be found around the city this summer.
It was, and is truly a privilege to be involved in Gromit Unleashed. As well as being a lot of fun, once the trail has finished all 80 Gromit sculptures will be auctioned to raise funds for Wallace and Gromit's Grand Appeal, the Bristol Children's Hospital Charity - a very worthy cause!
If you'd be interested in seeing my previous post on the creation of Grrrrromit, a Mexican wrestler/tiger styled Gromit ... click here.